Circular Saw Safety Tips Every DIYer Should Know for 2027
Wear safety glasses, clamp the board so it cannot move, set a shallow blade depth, keep both hands on the saw, and let the blade reach full speed before it touches the board. Those five habits are the core of circular saw safety tips, because a saw that looks simple can throw a board in a fraction of a second.
A circular saw looks simple, and that is part of the risk. It cuts plywood, boards, and trim fast, it fits in one hand, and it makes a beginner feel skilled after one clean cut. That same speed means a small setup error can turn into a deep cut, a thrown board, or an eye injury in a fraction of a second.
This guide gives you the full set of circular saw safety tips a beginner needs, from gear and guards to blade depth, clamping, kickback, cords, and stopping rules. If you already know how to use a power drill, you will notice a familiar pattern here: gear first, setup second, and a steady pace through the cut.
What Is Kickback and Why Does It Happen
Kickback is the sudden jump of the saw, or of the board, when the blade binds in the cut, and a 2024 study of United States emergency department records from 2003 to 2022 counted about 1.39 million saw injuries, with portable circular saws accounting for 13.6 percent of them, so this is not a rare accident. Binding happens when the cut closes on the blade, when the board twists into the back of the blade, when the board lifts and the rising teeth at the back catch it, when a worn or damaged blade grabs, or when an unsupported offcut sags and pinches the blade. The result feels instant, and you cannot react fast enough to stop it once it starts, which is why circular saw safety tips start with preventing the bind, not reacting to it.
That is why circular saw safety tips focus on prevention rather than reaction. A sharp blade, a shallow blade depth, a clamped board, a straight feed, and a free offcut all stop binding before it starts. Every rule below exists to remove one cause of binding, so the cut stays calm from start to finish.
A dull blade makes binding more likely, because it needs more push, creates more heat, and wanders in the cut. A board that is free to move can twist into the blade.
An offcut that is trapped, or held by a second person, can pinch the blade as the cut closes. Control the setup and you control most of the risk.
Wear the Right Gear Before the Saw Starts
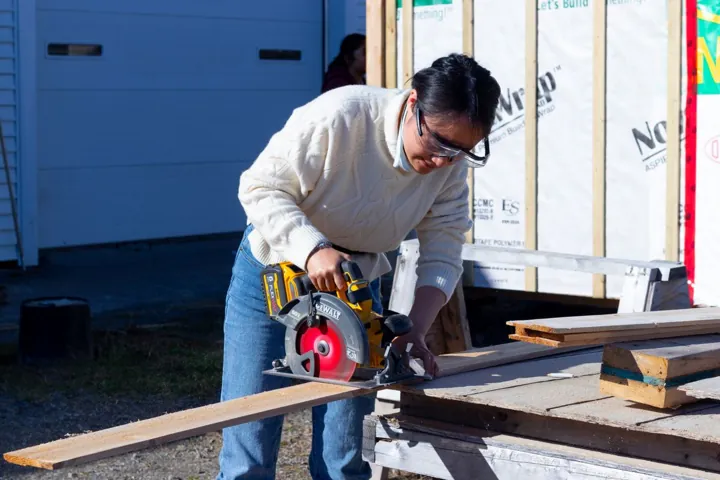
Gear goes on before the saw does, and every list of circular saw safety tips starts there, before you mark a line or fit a blade, and a circular saw runs at 100 to 105 decibels at the operator, so hearing protection is not optional: the National Institute for Occupational Safety and Health allows 15 minutes at 100 decibels. Put the gear on, check the fit, and keep it on until the blade stops and the dust settles. The table below lists the gear that matters for ordinary home cutting and when each item earns its place.
| Gear | When to wear it | What to check |
|---|---|---|
| Safety glasses with side shields | Every cut, no exceptions | Impact rated mark on the frame, snug fit, no slipping |
| Sealed goggles | Overhead cutting, dusty demolition, masonry dust | Seal sits flat on the face, lens stays clear |
| Dust mask | Cutting masonry, fiber cement, or dusty boards | Mask fits the face, straps sit flat, nose clip shaped |
| Hearing protection | Long sessions, masonry cutting, loud workshop work | Plugs seated, or muffs fully over the ears |
| Sturdy closed shoes | Every job | Good grip, toes covered, laces tied |
| Work gloves for handling only | Carrying boards, handling rough timber, clearing debris after cutting | Gloves off before the blade spins |
Ordinary eyeglasses are not safety glasses. Everyday glasses can break, they lack side shields, and chips can slip in from the side. If you wear prescription lenses, wear safety glasses made to your prescription, or wear sealed goggles over your regular glasses.
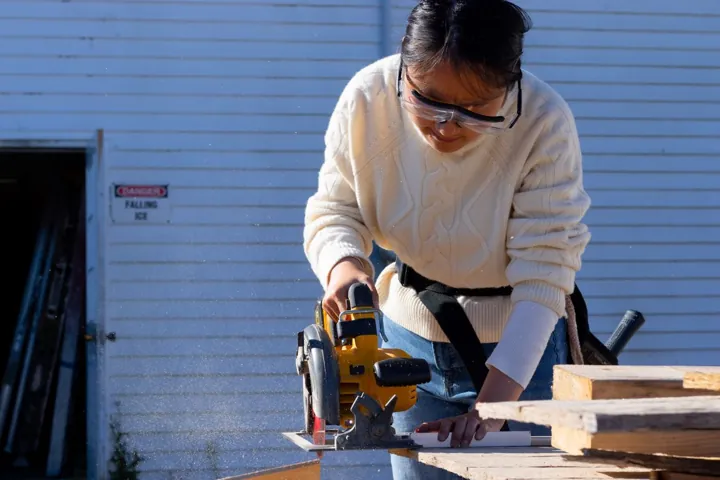
Circular saw safety tips choose glasses for open cutting and goggles for overhead work. When you cut above your head, dust and chips fall straight down toward your face, and glasses with open sides give particles a path in. Goggles seal that path.
A face shield adds a second layer for heavy debris, but it replaces neither glasses nor goggles underneath it. Gloves follow the same clear rule as in other power tool work: wear gloves to carry boards and handle rough offcuts, then take them off before you cut.
A glove can catch on a spinning blade and pull a hand toward it, and that risk is greater than the small comfort gloves give while cutting. The same rule covers loose sleeves, dangling jewellery, and long hair. Tie hair back, roll sleeves up tight, and remove rings, bracelets, and necklaces before the saw runs.
Check the Guard and the Blade Before Every Cut
The blade guard is the most important safety part on the saw, and it must work before you cut, because a stuck guard is a saw that should not run. The guard must enclose the teeth, snap back before you set the saw down, stay clean of sawdust, and never be pinned open, and that checklist is the first of the circular saw safety tips worth memorizing.
The United States Occupational Safety and Health Administration states in its machine guarding guidance for handheld saws that a portable circular saw must have an upper guard that covers the entire blade and a retractable lower guard. That rule is cited as 29 CFR 1926.304(d) in the same guidance.
Check the lower guard by hand with the saw unplugged, or with the battery removed. Push it back gently and let go.
It should snap back at once to cover the blade. If it sticks, drags, or stays open, stop and fix it or replace it before you cut.
Never tie, wedge, or clamp the lower guard open. A guard held open leaves the blade exposed after the cut, when you set the saw down, and when you reach for the next board. A guard that works freely protects you in exactly those quiet moments, when you are not thinking about the blade.
Check the blade next. It must be sharp, free of cracks, and made for the material you plan to cut. A wood blade suits boards and plywood.
A masonry blade, with the right saw setting where your manual allows it, suits brick and block. A cracked, bent, or heavily worn blade must be retired at once.
Check the blade direction and the blade nut with the power off. Teeth should point in the rotation direction shown by the arrow on the guard.
A blade fitted backwards cuts poorly, burns the wood, and binds far more often. A loose blade can wobble and cut off line.
Set the Blade Depth So Only a Little Blade Shows
Blade depth is one of the simplest settings to get right, and beginners often get it wrong by setting the blade far too deep. Circular saw safety tips on depth agree on one number: about a quarter inch below the board, inside the Texas Mutual rule of 1/8 to 1/4 inch below the board. A deep blade exposes more teeth below the board, and those teeth can catch a sawhorse, a bench, or the offcut, while a shallow blade cuts cleanly and keeps the risk low.
A toolbox talk from Texas Mutual Insurance Company gives a clear rule for this setting: set the blade so its lowest tooth sits 1/8 inch to 1/4 inch below the workpiece. That small margin is enough to cut through the board, and it leaves very little blade exposed underneath. Use that rule for every board you cut.
Circular saw safety tips on depth setting continue here: set the depth with the power off, then check it against the board itself. Loosen the depth lever, lower the shoe until the blade sits at the right depth, and lock the lever firmly. A depth setting that slips during a cut changes the cut and the risk at the same time.
Check the bevel setting too, when you plan an angled cut. A bevel changes how deep the blade sits and how the saw sits on the board. Lock it firmly, and make a practice cut on scrap before you cut the real board.
Run This Twelve Point Check Before Every Cut
Run these checks before every cut. Two minutes here catch the faults behind most beginner injuries, and that is the fastest of all circular saw safety tips to learn. It catches the faults that cause most beginner injuries, and it works for a plywood sheet, a shelf board, or a deck board alike.
- Put on safety glasses, then add a dust mask and hearing protection when the job calls for them.
- Tie back hair, remove jewellery, roll up loose sleeves, and take off gloves before the blade spins.
- Check that the upper guard and the lower guard are in place and that the lower guard springs back freely.
- Fit a sharp blade made for the material, check its direction, and tighten the blade nut with the power off.
- Set the blade depth so the lowest tooth sits 1/8 inch to 1/4 inch below the board, then lock the depth lever.
- Unplug a corded saw, or remove the battery from a cordless saw, before you change a blade or adjust a setting.
- Clamp the board to a stable bench or sawhorses, and make sure the offcut side can fall free after the cut.
- Keep the cord behind you and clear of the cutting path, and keep the floor free of offcuts you could trip on.
- Mark the cut line clearly, and clamp a straight guide in place when the cut must stay straight.
- Stand to the side of the blade line, keep both feet flat, and keep your body balanced through the whole cut.
- Let the blade reach full speed before it touches the board, feed at a steady pace, and never force the saw.
- Release the trigger at the end of the cut, let the blade stop fully, and check that the guard has closed before you set the saw down.
Two checks on that list deserve extra stress because beginners skip them most. The first is the guard check. A sticky guard feels like a small fault, but it leaves the blade open after every cut.
The second is the offcut check. A trapped offcut pinches the blade as the cut closes, and that pinch is a classic kickback trigger. The keep side of the board must stay clamped and steady, while the offcut side must be free to drop clear.
Clamp the Board and Support Both Sides
A board that moves during a cut is a board that can bind, twist, or throw, and the rule on clamping is the same in every guide: clamp the keep side firmly and support both ends, which is the first of the circular saw safety tips to follow before you mark a line. Clamp the keep side firmly to a bench or to sawhorses, and support the board near the cut so it cannot sag and pinch the blade. For a long board, use two sawhorses, one near each end, and keep the cut outside the sawhorses, so the offcut falls free instead of pinching the blade.
For a large plywood sheet, lay it on foam insulation boards on the ground, or on a full support frame, so the sheet stays flat through the cut. A sheet that sags in the middle closes the cut on the blade, just as a trapped offcut does. Full support stops that sag before it starts.
Circular saw safety tips forbid one habit outright: never hold a board in one hand while you cut with the other, and never brace a board against your leg or your foot. Legs do not count as a work support, and a board braced on a leg can move, bind, and cut far more than the board. If a board is too small to clamp safely, clamp it to a larger board, or use a different tool.
Circular saw safety tips on grip are clear: keep both hands on the saw during the cut. One hand holds the main grip, and the other holds the front handle where your saw has one. Keep your fingers clear of the blade line, and never place a hand behind the saw in the path a kickback would take.
Saw types, blade teeth, and the riving knife
Not every circular saw is the same tool, and circular saw safety tips start with knowing which one you are holding, and a sidewinder, the common homeowner saw, has the motor beside the blade and is light and easy to handle, while a worm drive puts the motor behind the blade, gives more torque, and suits long rip cuts in thick lumber. A cordless saw trades power for freedom from the cord, and a track or plunge saw runs on a rail for dead straight cuts in sheet goods, so buy the sidewinder for a first saw, and hire or borrow a track saw for a plywood kitchen, because the guide rail is what makes the cut straight, not your eye, and that is one of the circular saw safety tips that matters most on sheet goods. Blades cost little: a Diablo 24 tooth framing blade runs about $10, and a Diablo 60 tooth finish blade about $20, following Power Tool Insider.
| Blade | Best for | Finish |
|---|---|---|
| 24 tooth framing blade | Ripping and framing lumber, fast cuts in 2 by 4s | Rough, needs sanding |
| 40 tooth general purpose blade | General construction, crosscuts, plywood | Clean enough for most jobs |
| 60 to 80 tooth finish blade | Trim, cabinets, veneered plywood, melamine | Smooth, little tear out |
Two blades cover most home jobs, and circular saw safety tips on blades agree on the pair: a 24 tooth for framing and a 40 tooth for everything else, and a 60 tooth for the day you cut veneered plywood and cannot afford tear out. Fewer teeth cut faster and rougher, because the big gullets clear sawdust; more teeth cut slower and cleaner, because each tooth takes a smaller bite.
The riving knife is the thin fin that sits behind the blade and keeps the cut, the kerf, from closing on the blade, and it is the part circular saw safety tips mention least and kickback needs most. A closing kerf pinches the blade, and a pinched blade is what throws the saw back at you, so never remove the riving knife, and on an older saw without one, the splitter does the same job, and if your saw has neither, do not cut sheet goods with it until you fit one, because kickback starts exactly where the kerf closes.
Use a Guide for Straight Cuts
Use a guide rail, a clamped straight board, or a speed square for straight cuts, which gives the saw shoe a firm edge to run against, and that edge keeps the cut straight without steering by hand. Steering by hand invites a twist, and a twist invites binding. Clamp the guide firmly at both ends, and check that the saw shoe runs flat against it before you start.
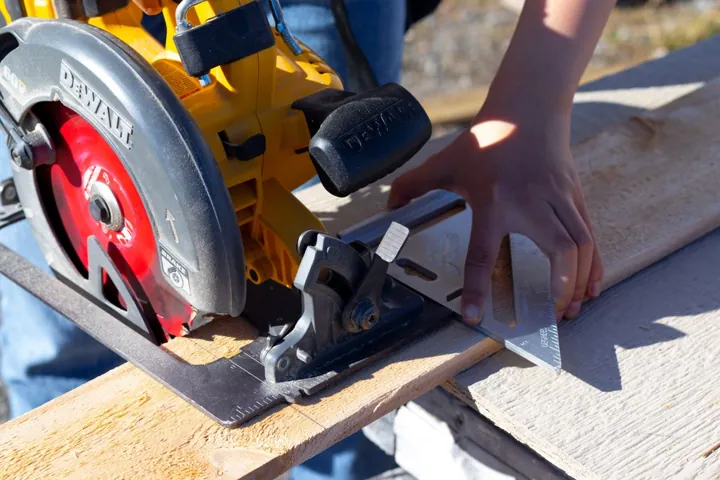
For a short crosscut across a board, a speed square works well. Hold the square firmly against the board edge with your free hand, well clear of the blade path, and run the saw shoe against the square through the cut. For a long rip cut along a board, clamp a straight board as a guide and run the shoe against it for the full length.
Measure the offset before you clamp the guide. The distance from the blade to the edge of the shoe is fixed on your saw, so mark the cut line, measure that offset, and clamp the guide that far from the line. A practice cut on scrap confirms the offset before the real board is at risk.
Keep the guide clear of the cord and clear of clamps in the blade path. A clamp sitting in the cut line will stop the saw mid cut, and a mid cut stop is exactly when a beginner pushes harder and binds the blade. Plan the clamp positions before the blade starts.
Stand, Grip, and Feed the Saw the Safe Way
Stand to the side of the blade, not directly behind it. If kickback happens, the saw jumps back along the blade line, and circular saw safety tips on stance exist because that line is where you do not want to be, and standing to the side keeps your body out of that path. Keep both feet flat, knees soft, and weight even, so a sudden jump does not throw you off balance.
Hold the saw firmly with both hands, keep your wrist straight, and keep your arm in line behind the saw. Start the saw away from the board, let the blade reach full speed, then ease the blade into the cut line. A blade that starts inside the wood can grab and jump at once.
Feed the saw at a steady pace and let the blade cut. Leaning on the saw does not make the cut come any quicker.
It overheats the blade, dulls the edge, and raises the chance of a bind. If the saw slows, bogs down, or starts to smoke, stop, release the trigger, and check the blade, the depth, and the support before you continue.
Ease off pressure near the end of the cut, so the blade does not grab as it breaks through the far edge. Support the offcut so it falls free, and keep the saw moving straight until the cut is complete. Do not lift the saw out of a half finished cut while the blade still spins.
Cords, Batteries, and Wet Areas Need Their Own Rules
A corded saw brings two risks a cordless saw does not: a damaged cord and a trip hazard, and circular saw safety tips on cords start at the plug, not at the trigger. Inspect the cord before each job for cuts, frays, and loose connections at the plug and the housing, and keep the cord behind you and clear of the cutting path, and never carry the saw by its cord, and never hold your fingers on the switch while carrying a plugged in tool, and disconnect the tool when it is not in use, before servicing it, and when changing accessories, following the OSHA power tools eTool.

Never use a corded saw in a wet or muddy spot. Water and mains power together turn a small fault into a shock risk. When you need an extension cord outdoors, use one rated for outdoor use, keep connections off wet ground, and protect the cord from the blade path and from foot traffic.
Battery saw safety adds a different set of rules. Charge only with the charger specified for that battery, and use only the battery pack designated for your tool. Store a battery away from keys, coins, nails, and screws when it is out of the saw, because metal across the terminals can short the pack.
Do not use a battery that is cracked, swollen, leaking, or hot to the touch. Store batteries at room temperature, keep them out of reach of children, and remove the battery before you change a blade, adjust the depth, or carry the saw. A battery saw stays live even when it is not plugged into a wall, so a trigger caught in a toolbox can start it by accident.
What to Do When the Saw Binds or Stalls
When a saw binds, release the trigger at once and hold the saw steady until the blade stops, because that is the first of the circular saw safety tips for a bind, and it is the opposite of what panic tells you to do. Do not fight the jump, do not yank the saw sideways, and do not restart the blade inside a bound cut, because a restart inside a pinched cut is a fast route to a second kickback.
Once the blade stops, lift the saw clear, check the board, the support, and the offcut, and find what pinched the blade. Often the board sagged, the offcut was trapped, or the guide moved. Fix that cause, check that the blade is still sharp and tight, and start again with a fresh setup.
When a saw stalls in thick or dense wood, the cause is often a dull blade, too much feed pressure, or a blade that is too deep. Replace a dull blade, reset the depth to the 1/8 inch to 1/4 inch rule, and feed more slowly. A test cut on scrap tells you whether the fix worked, with no real board at risk.
Stop the job when the saw smells of burning, when the blade wobbles, when the guard sticks, or when the trigger sticks. A tool that misbehaves is warning you, and ignoring it risks the tool and the job. Unplug the saw, or remove the battery, before you inspect it.
A Safe Plywood Cut, Worked Through Step by Step
A plywood cut is where these circular saw safety tips come together, and it is the best test of every habit on this page. Imagine cutting a 4 foot by 8 foot sheet of plywood into two shelf boards for a garage storage unit, each board 2 feet wide and 8 feet long. The cut itself is simple.
The safety work around the cut is where beginners usually go wrong, so walk through it slowly.
Start with the gear and the checks, and mark a line only after that. Put on safety glasses, tie back hair, and remove jewellery. Check the guard by hand with the battery removed, fit a sharp plywood blade, and set the depth so the lowest tooth sits 1/8 inch to 1/4 inch below the sheet.

Lay the sheet flat on foam boards on the ground, so it stays fully supported through the cut. Mark the cut line at 2 feet from one long edge, measure the shoe offset, and clamp a straight board as a guide at the right distance from the line. Check that no clamp sits in the blade path.
Stand to the side of the blade line, hold the saw with both hands, and let the blade reach full speed before it touches the plywood. Feed at a steady pace along the guide, ease off near the far edge, and let the offcut side stay free so it cannot pinch the blade as the cut closes.
At the end of the cut, release the trigger, let the blade stop fully, and check that the guard has closed before you set the saw down. Lift the cut board clear, check the edge for splintering, and repeat the same setup for the second board. That single job uses every rule in this guide: glasses, guard, depth, support, guide, stance, steady feed, and a stopped blade before the saw rests.
Mistakes That Cause Most Circular Saw Injuries
The mistakes below are the ones I see most often, and each one maps to a simple fix, and that is the practical half of circular saw safety tips, and the half most people skip. Use the table below to match each mistake with its risk and its fix, and keep it beside the checklist until the fixes feel automatic.
| Mistake | Risk | Fix |
|---|---|---|
| Skipping safety glasses for a quick cut | Chip or dust in an eye | Glasses on before the saw runs, every time |
| Tying or wedging the lower guard open | Exposed blade after the cut | Fix or replace a sticky guard, never hold it open |
| Setting the blade far too deep | Blade catches the bench or the offcut | Lowest tooth 1/8 inch to 1/4 inch below the board |
| Cutting a board held by hand | Board twists and binds the blade | Clamp the board to a bench or sawhorses every time |
| Trapping the offcut so it cannot fall free | Cut closes and kicks back | Keep side clamped, offcut side free to drop |
| Pushing hard to cut faster | Blade binds and the saw jumps | Sharp blade, steady feed, slow finish through the far edge |
| Standing directly behind the blade | Body in the kickback path | Stand to the side, feet flat, body balanced |
| Changing a blade with the battery fitted | Trigger starts the saw by accident | Remove the battery or unplug the saw first |
One more habit prevents a whole class of accidents: practice the exact cut on scrap first. A test cut tells you the blade depth, the guide offset, and the feel of the material before the real board is at risk. Scrap practice also gives you a safe place to learn how a bind feels, with no shelf, no ladder, and no finished board involved.
It takes a minute, and it is the cheapest insurance in any cutting job.
Storage, Children, and After the Job
The job does not end when the last cut sits clean, so put the saw away properly, because circular saw safety tips for storage are the dull part that keeps the next job safe. Remove the battery, or unplug a corded saw, and wipe dust from the vents and the guard so the next job starts clean, then store the saw on its side on a stable surface, or hung where it cannot fall, with the blade guard closed.
Keep the saw, blades, and batteries out of reach of children, and never let a person unfamiliar with the tool use it unsupervised. Check the guard, the cord, and the blade before the next job, not during it. A guard that stuck last time will still stick next time until it is fixed.
Add saw checks to your home maintenance checklist so the tool stays ready and safe between jobs. A quick check each season covers the guard spring, the blade condition, the cord condition, and the state of your safety glasses. Scratched or loose glasses protect far less than they appear to, so replace them when the lens clouds or the frame no longer sits snug.
Keep a basic first aid kit within reach of your work area, and know its spot before you start, because a cut, a splinter, or dust in an eye needs calm, quick treatment, not a hunt through cupboards. If an eye is hurt, do not rub it.
Rinse the eye gently with clean water where appropriate, cover it lightly, and seek medical help at once when pain, vision change, or a foreign object is involved.
When to Stop and Call a Pro
Knowing when to stop is the last skill on this page, and of all the circular saw safety tips here, it is the one that saves the most money. A licensed pro should handle gas lines, main electrical panel work, structural changes, and major plumbing inside walls, and call a pro too when a cut involves a load bearing wall, a roof structure, or a material you cannot identify, such as an older painted board that may hold a hazard.
Check your own state the same way. If you feel dizzy, tired, or rushed, stop work.
Poor light means improve it or wait for daylight. If a job needs two people to hold a board steady, wait for the second person, or change the setup so clamps hold the board instead.
No shelf, deck board, or plywood cut is worth a fall, a shock, or an eye injury. Waiting until tomorrow beats finishing today with an injury.
One last warning before you cut: a circular saw spins fast, throws debris, and can jump sharply when a blade binds, and every list of circular saw safety tips says the same. Hold the saw firmly with both hands, keep your body to the side of the blade line, keep loose clothing, hair, and jewelry away from the blade, and never reach across a spinning blade. If a blade binds, release the trigger at once, hold the saw steady until the blade stops, and find the cause before you cut again.
This guide gives general safety information for home DIY work. It does not replace your saw manual, and for gas, electrical, structural, or major plumbing work, a licensed pro is the safe choice. For a broader view of the skills behind safe home work, read our guide to DIY basics and our guide to power drill safety tips, which covers the same gear first and setup second pattern for drills.
Sources for these circular saw safety tips: United States emergency department study 2003 to 2022, about 1.39 million saw injuries, portable circular saws 13.6 percent; Bayshore Safety noise guide, circular saw 100 to 105 decibels at the operator, NIOSH 15 minutes at 100 decibels; Power Tool Insider saw blade guide, Diablo 24 tooth framing blade about $10, Diablo 60 tooth finish blade about $20; OSHA machine guarding guidance for handheld saws, upper guard covers the entire blade, retractable lower guard, 29 CFR 1926.304(d); Texas Mutual circular saw safety guide, blade depth 1/8 to 1/4 inch below the board. All five links open the publisher guides directly.
Related guides
- How to Use a Power Drill: A Beginner Guide for 2027
- Power Drill Safety Tips Every DIYer Should Know for 2027
- DIY Basics for Homeowners: Essential Skills to Learn in 2027
- The Ultimate Home Maintenance Checklist for 2027
- What Is Never to Be Engaged When Using Power Tools in 2027
Frequently Asked Questions
Can I use a circular saw safely as a complete beginner?
Yes, when you follow circular saw safety tips in order: gear first, guard and blade checks second, and a clamped board with a shallow blade depth before any cut. Start with short straight cuts on scrap, use a guide for straight lines, and stop when anything feels wrong.
What is the safest blade depth for a circular saw?
Set the blade so its lowest tooth sits 1/8 inch to 1/4 inch below the board, following the Texas Mutual Insurance Company toolbox talk rule. That small margin cuts cleanly through the board and leaves very little blade exposed underneath.
Why does my circular saw kick back?
Kickback usually means the blade bound in the cut, because the cut closed on the blade, the board twisted into the back of the blade, or the offcut was trapped. Check the support, the clamping, the blade sharpness, and the blade depth, then fix the cause before you cut again.
Should I wear gloves while using a circular saw?
No, not while the blade spins, because a glove can catch on the blade and pull your hand toward it. Wear gloves to carry boards and handle rough timber, then take them off before you cut, and keep sleeves tight and hair tied back.
Do I need a guide for every straight cut?
A guide is not required for every short cut, but it is the safest choice for long cuts and for any cut that must stay straight. A clamped straight board, a guide rail, or a speed square stops hand steering, and hand steering is a common cause of binding.
When should I stop cutting and call a pro?
Stop when the guard sticks, the blade wobbles, the trigger sticks, or the saw smells of burning, and stop too when a cut involves a load bearing structure or a material you cannot identify. A licensed pro is the safe choice for structural work and for any job where you cannot confirm a safe setup.