How to Flush a Gas Water Heater in 2027
Turn the gas control to Pilot or Off, shut the cold water inlet, and let the tank cool, then hook a hose to the drain valve, open a hot tap, and drain the tank. Rinse with bursts of water until the flow runs clear, refill the tank, and relight the pilot. That is how to flush a gas water heater.
The first bucket came out the color of weak coffee, and Mara knew the shower had been trying to tell her something for weeks. The water went lukewarm halfway through every shower, and the tank in the garage popped like a kettle every time the burner kicked on.
I have seen a tank go from a quiet hum to a popcorn pop in one summer, and the fix took less than an hour. Mara spent a Saturday morning on it, and the shower has stayed hot since, which is why learning the routine is worth an hour of your year.
Sediment is the culprit in most of these stories. Tap water carries dissolved minerals, mostly calcium and magnesium, and heat drops them out of the water to sink as a gritty layer on the tank floor. That layer is the whole reason this job exists, and a gas tank gives you one extra part to respect before you touch it: a live flame under the tank, fed by a gas line you must control first.
Why a gas tank plays by different rules
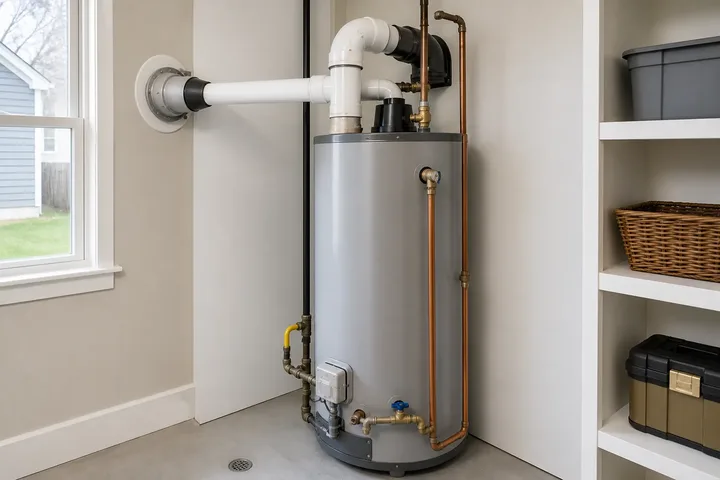
A gas tank heats water with a burner under the tank, fed by a gas line and lit by a small pilot flame that burns all the time. A metal vent pipe on top carries the exhaust outside, and a gas control valve on the front of the tank decides when the burner fires.
A gas tank has no breaker to flip and no heating element to protect. It has a flame to manage, which means the first move is a dial on the tank itself, not a switch in another room.
The burner sits in a small compartment at the bottom of the tank, behind a metal door with a round sight glass. Through that glass you can see the pilot flame, a small blue flame that stays lit so the burner can fire whenever the thermostat calls for heat.
Our guide to how a water heater works explains the tank, the burner, and the thermostat in plain words, with the parts laid out so you can find each one on your own heater.
Sediment hurts a gas tank in its own way. The layer sits between the burner and the water, so the flame has to burn longer and hotter to push heat through it. Engineer Fix puts it plainly: the scale acts as insulation between the burner and the water, forcing the system to work harder and use more gas.
Water trapped under that layer boils into steam bubbles, which is the popping and rumbling sound owners hear when the heater runs. Flushing once a year clears the layer before it can steal your gas money or cook the bottom of the tank. That yearly rinse is the quiet payoff of knowing how to flush a gas water heater.
How often should you flush a gas water heater
For most homes, once a year hits the mark. Rheem prints that schedule in its flushing guide, and both Rheem and A. O. Smith agree on the number, which makes it an easy one to trust.
If your water leaves white scale on taps and shower heads, Rheem says the right rhythm is every 6 months, and that is the schedule to follow once you can flush a gas water heater. Your water hardness number sits in the water quality report your supplier must publish every year, and anything above 7 grains per gallon counts as hard.
A. O. Smith asks for something different on a new tank: flush it once after the first 6 months, so you can see how much sediment your water drops in half a year. The US Department of Energy adds its own light routine to the same schedule: test the temperature and pressure relief valve every 6 months, and check the anode rod every 3 to 4 years.
| Your water | Full drain and flush | Light routine |
|---|---|---|
| Soft or normal | Once a year | Test the relief valve every 6 months |
| Hard water, 7 plus grains per gallon | Every 6 months | Test the relief valve every 6 months |
| Well water with grit you can see | Every 6 months | Test the relief valve every 6 months |
| New tank, first year | 6 months after install | See what the first flush reveals |
Three warning signs say the tank is overdue, whatever the calendar claims. Listen for popping while the burner runs, watch for a shower that turns lukewarm halfway through, and look for a short burst of rusty water when you first open a hot tap.
Any one of those means the sediment layer has grown thick enough to matter, and the flush cannot wait for a free weekend. If you have never done it, learning the routine takes one Saturday morning, and the next one takes half that.
Gather your gear first
You need less gear than you think to learn to flush a gas water heater, and all of it is cheap: a garden hose long enough to reach a floor drain or outside, a clear bucket, old towels, a flat head screwdriver, work gloves, safety glasses, and a flashlight.
Two items are easy to forget, and both matter on a gas tank. The first is a long lighter or a box of long matches, in case your pilot needs relighting and your model still lights by hand. The second is a roll of tape and a marker, so you can write the date on the side of the tank when the job is done.
Keep your phone in your pocket while you work. Before you start, take a photo of the gas control valve with the dial position marked, so you can put it back exactly where it was. Snap a photo of the drain valve too, since it hides down low in the dark corner behind the tank.
Check the label on your tank before you touch anything. The lighting instructions printed there are specific to your model, and they win over any guide, including this one. If your heater has a sealed combustion chamber, leave the burner compartment closed except for the sight glass, and do not open panels you do not need to touch.
Turn the gas control down and let the tank cool
Before you touch the drain valve, you turn the gas control down, because that is step one to flush a gas water heater. Find the gas control valve on the front of the tank, low down, with a round temperature dial and a smaller knob on top marked Off and Pilot.
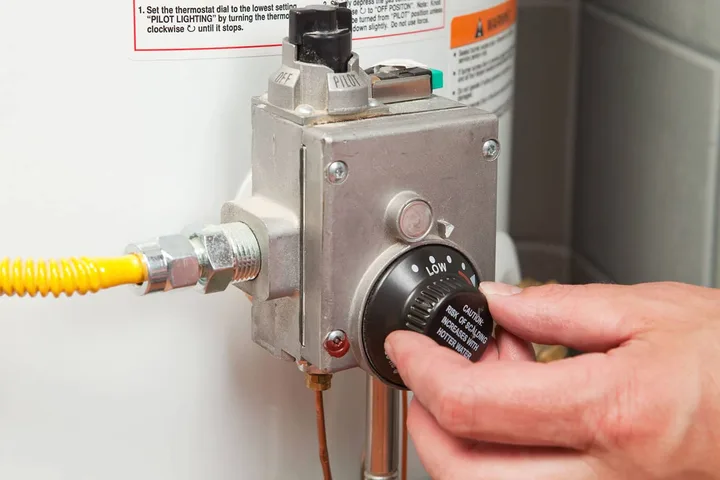
Turn the top knob to Pilot or Off, and follow what your tank label says for servicing. Pilot leaves the small pilot flame burning while the main burner stays off, which makes relighting easy at the end. Off shuts the gas down fully, which some labels ask for, and means you relight the pilot from scratch when the job is done.
Either setting works, as long as the main burner cannot fire while the tank is empty. Most labels say Pilot is fine, and that choice is part of the job safely. A burner firing under an empty tank can damage it, and that is the one outcome this step exists to prevent.
Now let the water cool. Tank water sits at 120 degrees Fahrenheit or hotter, and it can scald you through a garden hose. Engineer Fix says to wait about 2 hours after shutting off the gas, so the water can cool from its working temperature of 120 to 140 degrees, and the Energy Trust of Oregon suggests letting it cool overnight, which is the safest plan if you have the time.
Give the tank a few hours at least, or switch the gas control down the night before and finish in the morning. A cool tank is a safe tank, and the wait costs you nothing but time.
Short on time? Run a hot tap for a while and let cold water push the heat out of the tank. That trick takes the edge off, but the tank still needs time to cool, so wear your gloves and stay clear of the hose end at first.
Use the cool down time to find the cold water shutoff on the pipe that feeds the top of the tank, often marked in blue. Close it all the way clockwise, so the tank cannot refill itself while you drain it.
One warning before you go further: if you smell gas at any point, stop and ventilate the area. Open windows, leave the house, and call your gas company from outside. Never try to work through a gas smell, and never light a match to look for a leak.
Step by step: flush the gas tank
The steps below walk through a gas water heater flush on a standard 40 or 50 gallon tank. Plan on 60 to 90 minutes from start to finish, and give yourself the full 90 the first time, because cooling and refilling take longer than the draining itself.
If your heater runs on electricity instead of gas, this is the wrong guide for it. Our guide to how to drain a gas water heater covers the drain only, and our guide to how to flush a water heater covers the general flush for gas and electric tanks in fewer steps.
Step 1: Turn the gas control to Pilot or Off. Turn the top knob on the gas control valve to Pilot or Off, exactly as your tank label says for servicing. Check through the sight glass that the main burner is out, and leave the pilot alone for now.
Step 2: Shut the cold water feed. Twist the shutoff on the cold pipe above the heater clockwise until it stops turning. Without this, fresh water keeps refilling the tank as fast as it drains, and the job never ends.
That valve is easy to miss on a first flush, so find it during the cool down, not after the hose is already on.
Step 3: Crack open a hot tap. Pick the hot tap closest to the heater and leave it running. The open tap feeds air into the tank, so the water flows out in a steady stream instead of gulping and stopping.
Without it, the tank drains in fits and starts, which is the most common frustration for a first timer learning the routine.
Lifting the lever on the relief valve near the top of the tank does the same thing.
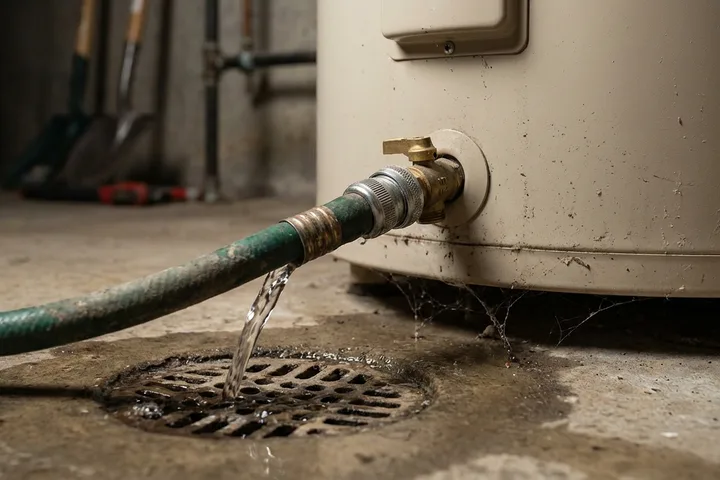
Step 4: Hook up the garden hose. Screw the hose onto the drain valve near the bottom of the tank, then lay the far end in a floor drain, a sump pit, or outside, with the hose running downhill the whole way. Keep the hose end at or below the bottom of the tank, or the last gallons will sit in there and never come out.
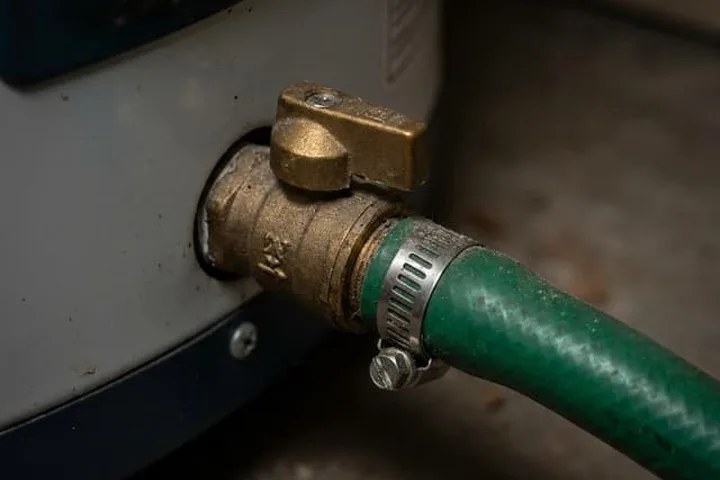
Put the hose on before you touch the drain valve, because a valve nobody has opened in years is the part most likely to turn a free chore into a service call. That tip comes from Montana State University Extension, and it is worth remembering.
Step 5: Crack the drain valve open. Turn the valve open gently with a flat head screwdriver, and keep your hands clear of the hose end. The first water out is the hottest and the dirtiest, so let it run until the flow slows to a trickle, which takes 20 to 40 minutes on most tanks, according to A. O. Smith.
Watch the bucket during those first minutes, because the color of the water tells you how much sediment you are dealing with. Brown water with grit is normal on a tank that has never been flushed, and it is the whole point of the job.
Step 6: Blast the sediment out. Leave the drain valve open and switch the cold water on for 10 to 20 seconds at a time. Every burst lifts grit off the tank floor and carries it out through the hose, so repeat it until the water comes out clear.
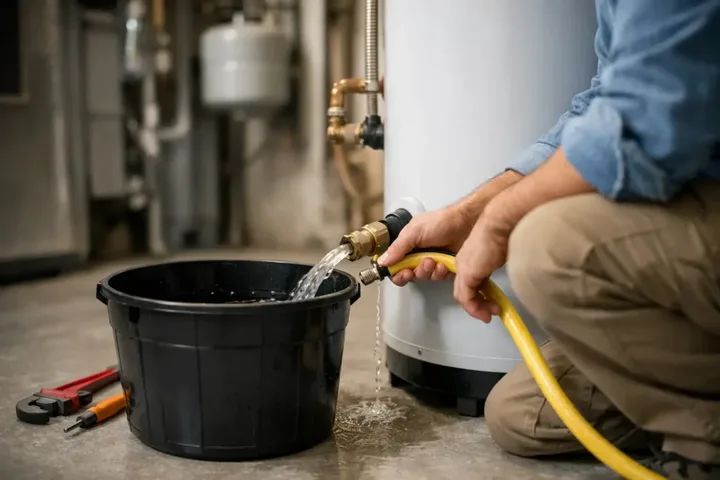
Engineer Fix says to repeat the burst 5 to 8 times, and Repairza says the same thing in its own words: keep flushing until the flow is strong and steady with no sandy grit. On a tank with years of buildup, five to eight bursts is the honest count to flush a gas water heater properly. A little cloudiness is normal, but chunks and heavy grit mean keep going.
Step 7: Shut the drain valve. Close the valve firmly and pull the hose off. Watch the valve for drips, since one that has sat still for years often weeps a little the first time it moves.
A slow drip often stops once the washer settles back in place, while a steady leak means the valve needs a new one.
Step 8: Fill the tank back up. Open the cold water feed all the way and let the tank fill while the hot tap stays open. The tap will spit and sputter while air leaves the pipes, then settle into a smooth steady stream, and that stream tells you the tank is full.
Leave it running full for at least 3 minutes, so the last air pockets leave the tank and the lines. Rheem says it straight in its manual: make certain the tank is completely full before you put it back in operation.
Step 9: Relight the pilot and turn the gas back on. Relighting the pilot is the last step to flush a gas water heater, and it is the one most owners worry about. Turn the top knob to Pilot, press and hold it, and light the pilot through the access door with a long lighter, following the lighting instructions on your tank label exactly.
Hold the knob down for about a minute after the pilot lights, then let go and check that the flame stays lit. Turn the knob back to On and set the temperature dial to your normal setting, usually 120 degrees.
Look through the sight glass and watch the main burner fire. You should see a steady blue flame under the tank, and the heater should run quietly. Give the tank 30 to 60 minutes to heat back up before you expect a hot shower.
How long does it take to flush a gas water heater
Cooling eats the most time, and most owners wait longer for the water to cool than they spend on the rest of the job.
| Part of the job | Time | Source |
|---|---|---|
| Cooling the tank | A few hours, or overnight | Engineer Fix and Energy Trust of Oregon |
| Draining a 40 or 50 gallon tank | 20 to 40 minutes | A. O. Smith drain guide |
| Draining with heavy sediment | 30 to 60 minutes | Engineer Fix |
| Whole job, first time | 60 to 90 minutes | Nuflow DFW |
| Reheat after refill | 30 to 60 minutes | Weeks Service Company |
Grit chokes the drain valve opening, so the flow fades to a trickle while the tank is still half full.
If your tank has never been drained, budget the full 90 minutes, and do not plan a shower for the hour after you turn the gas back on. That is the honest window for the first flush. Those numbers are the reason most owners do this job on a Saturday morning, when a slow drain costs nothing but time.
What if the pilot will not stay lit
A pilot that will not stay lit is the most common surprise after you learn to flush a gas water heater. The pilot flame heats a small sensor called a thermocouple, and the thermocouple tells the gas valve it is safe to keep the gas flowing. If the flame keeps going out, the sensor is the usual suspect.
Try relighting once more, holding the knob down a full minute this time, and check that the pilot flame actually touches the tip of the sensor. A weak flame that misses the sensor will not hold, and neither will a flame that keeps blowing out from a draft.
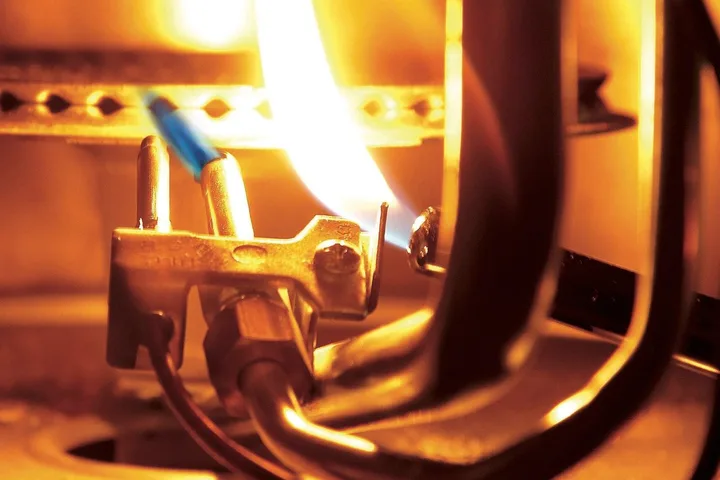
If the pilot still will not stay lit after two tries, stop and call a plumber. A new thermocouple is a small part, but the valve work around it is not a job to guess at, and a pro can test the sensor and the gas valve in one visit.
Do not hold the knob down for minutes at a time, and do not keep striking a lighter into a burner compartment that smells of gas. A pilot that will not hold is the one problem when you flush a gas water heater that belongs to a pro, not to a second attempt. If you smell gas, leave the house and call your gas company from outside.
What a plumber charges to flush a gas water heater
Knowing how to flush a gas water heater yourself saves $110 to $200 every year. That is the range Angi reports for a professional tank flush in 2026, with a national average of $160, and the do it yourself version costs almost nothing if you already own a hose.
| Option | Typical cost | Source |
|---|---|---|
| Do it yourself | $0 to $30 | Nuflow DFW |
| Plumber, standard tank flush | $110 to $200 | Angi |
| Plumber, gas tank flush | $100 to $175 | PlumbNow |
Nuflow DFW puts the do it yourself cost at roughly $0 if you already own a hose, and under $30 if you buy everything new. A pro visit makes sense when the tank is old, the valve is stuck, or the pilot will not stay lit, because the visit also covers the relief valve, the anode rod, and the thermostat, which a hose alone cannot check.
A pro visit also helps when the heater is under warranty, since some makers want a service record before they honor a claim. You pay for judgment, not hose work: knowing when to stop is worth the money on a tank you have never opened. Either way, the math favors doing it yourself once you can flush a gas water heater.
Mistakes that waste the whole job
Most bad flushes trace back to one of five mistakes, and all five are easy to avoid once you know them. The first is turning the gas back on before the tank is full, which lets the burner fire under an empty tank.
The second mistake is opening the drain valve on a tank that is still hot, which is how people get scalded while learning to flush a gas water heater. The third is grabbing pliers to force a stuck drain valve, which can snap it off and flood the room.
The fourth is skipping the rinse and closing up after one drain, which leaves the grit on the tank floor right where it was. The fifth is flushing a tank that is over 10 years old and has never been flushed, because the sediment may be the only thing plugging pinholes in the tank bottom, and disturbing it can open leaks.
Repairza warns owners about that last one in plain terms: if the tank is very old and has never been flushed, plan for replacement soon, and treat the flush as a gentle drain and refill, not a deep clean. If your tank is that old and that neglected, get a plumber to look at it first, and be ready to hear that a new tank costs less than chasing leaks.
Know when to hand it to a pro
Some jobs belong to you, and some belong to a pro. Stop and call a licensed plumber if the drain valve leaks steadily after you close it, if the tank body weeps water from a seam, or if the water stays rusty after a full flush, because rust after a flush can mean the tank lining is failing.
Call a pro too if the pilot will not stay lit, if you smell gas anywhere near the heater, or if the burner flame burns yellow and lazy instead of steady blue. Gas problems do not give second chances, and a pro with a meter can sort out in minutes what guessing cannot sort out at all.
The same rule holds for the vent pipe on top of the tank. If the vent looks loose, rusted through, or disconnected, do not run the heater. A bad vent can push exhaust gas back into the house, and that is a job for a licensed pro, not a Saturday fix.
Related guides
- How Does a Water Heater Work? Inside the Tank in 2027
- How to Drain a Water Heater in 2027
- How to Flush a Water Heater in 2027
- How to Drain a Gas Water Heater in 2027
- How to Flush Tankless Water Heater Units in 2027
- How Long Does a Gas Water Heater Last in 2027
Frequently Asked Questions
Do I turn the gas off or leave the pilot on to flush a gas water heater?
Either setting works, as long as the main burner cannot fire while the tank is empty. Pilot leaves the small flame burning so relighting is easy, while Off shuts the gas down fully and means you relight the pilot from scratch. Follow the servicing note on your tank label, because that label wins over any guide.
How often should I flush my gas water heater?
Most homes need it once a year, and hard water homes need it every 6 months. That is the schedule Rheem prints, and it is the one to follow when you know how to flush a gas water heater. A. O. Smith adds a first flush after the first 6 months of a new tank, so you learn early how much sediment your water leaves behind.
How long does it take to flush a gas water heater?
A 40 or 50 gallon tank takes 20 to 40 minutes to empty, according to A. O. Smith, and the full job runs 60 to 90 minutes with cooling and refilling. Heavy sediment slows the drain, so a tank that has never been flushed can take longer, and the water needs 30 to 60 minutes to heat back up after you turn the gas on. Those are the numbers to plan around when you flush a gas water heater for the first time.
Can I flush a gas water heater myself?
Yes, most owners can, with a garden hose, a bucket, and about an hour, plus the patience to let the tank cool and refill. The gas parts need respect: turn the gas control down first, never light a match near a gas smell, and relight the pilot exactly as the label says. If the tank is over 10 years old and has never been flushed, or the drain valve will not open, call a plumber instead.
Why does my gas water heater pop and rumble?
That noise is water trapped under sediment, boiling into steam bubbles, and A. O. Smith ties the same popping sound to lime buildup. Flushing the tank clears the layer, and the noise usually stops the same day, which is the fastest payoff of the whole job. If it keeps popping after a full flush, ask a plumber to check the burner and the bottom of the tank.
What should I do if the pilot will not stay lit after flushing?
Try relighting once more, holding the knob down a full minute, and check that the pilot flame touches the tip of the thermocouple sensor. If it still goes out after two tries, stop and call a plumber, because the sensor or the gas valve needs testing. Never keep striking a lighter into a burner compartment that smells of gas.
Gas, scalding water, and pressure share one small tank, so respect all three. Treat every step when you flush a gas water heater with that respect, and the job stays routine. Never work on the gas line, never turn the gas back on until the tank is full, never cap or plug the temperature and pressure relief valve, and if the tank body itself leaks, call a licensed plumber and do not wait.
Mara’s shower runs hot from the first minute now, and the tank has gone back to its quiet hum. Once you can flush a gas water heater, the yearly job takes about an hour, and the tank pays you back with quiet showers and lower gas bills.
Sources: Rheem, How Often To Flush Your Water Heater; Repair Me Yourself, Water Heater Maintenance; Engineer Fix, How to Clean a Gas Hot Water Heater; Repairza, How to Flush a Water Heater; Nuflow DFW, How to Flush a Water Heater; Angi, How Much Does It Cost to Flush a Water Heater; PlumbNow, Water Heater Flush Cost; US Department of Energy, Energy Saver, Storage Water Heaters. These numbers are national planning ranges from the sources above, not quotes for your home, so get written advice from a licensed local plumber before you budget or start work on a gas heater.